Installing FreeBSD - Standard Installation
Installing FreeBSD (article originally based on i386 architecture / version 4.7-RELEASE)
First things first, you need to make sure you've got FreeBSD available - preferably (for the purposes of this chapter) a burned CD of Disc 1 of a RELEASE snapshot. If you don't already have one, you can get a RELEASE snapshot from the official FreeBSD ftp site or from a mirror - I would personally recommend that you check out the official mirror list and hit one near you. Once you've got it, burn it, and we'll move on. Note: we're assuming that this is a new FreeBSD install, and that you're installing it on a machine with a CD-ROM and a motherboard with BIOS capable of booting from CD-ROM. We're also going to assume that FreeBSD is going to be the only OS on the machine, that you've got at least a 2 gig hard drive available, and you have 64MB of RAM installed. While you can certainly install FreeBSD without a CD and on a considerably lesser machine than the one described, it will be a bit more difficult - and although I may eventually discuss overcoming those difficulties in another article, they're outside the scope of this one.
This article was based on the i386 architecture, but is applicable largely to all architectures. Important architecture-specific notes are available for installing FreeBSD on the Sparc architechture.
Initial Kernel Configuration
NOTE: Kernel configuration during installation is no longer necessary applicable as of FreeBSD 5.0 and up. If you are installing 5.x, the first thing you'll see after boot (and the section you should skip ahead to right now) is the sysinstall main interface.
Before we actually install FreeBSD, you can save yourself a bit of time and trouble by cracking the case open and checking a couple of things out: namely, you want to know what kind of network card you're using, and what sorts of IDE or SCSI controllers you've got. (If you're using IDE, don't sweat it - you really don't have but one option.) For example, you might be using an SMC 1211 network card and an Adaptec 152x (or compatible) SCSI controller. Whatever it is, try to figure it out now - it'll make our first real step easier. Finally, make sure you know the TCP/IP settings the machine will need - IP address, subnet mask, nameserver address, and network gateway.
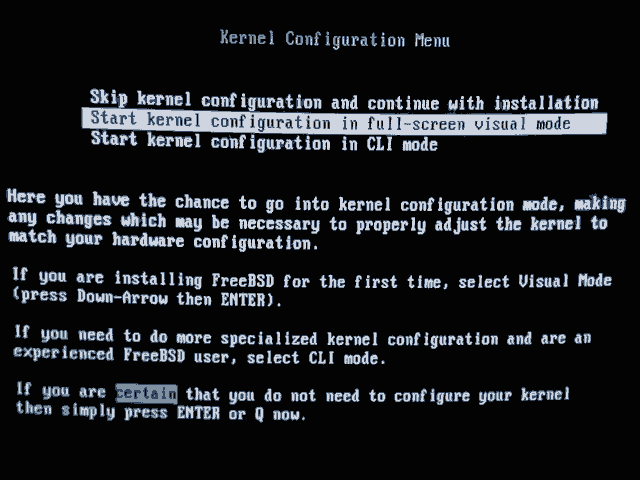
Okay, so you've got your machine ready, you've set your BIOS to boot from CD-ROM, and you've stuck the CD in the drive and booted. Now what? After a bit, you'll get a prompt "press enter to boot", which you can do, or you can wait a few seconds if you're lazy. The first real chance to make a choice comes up next, and it looks like this:
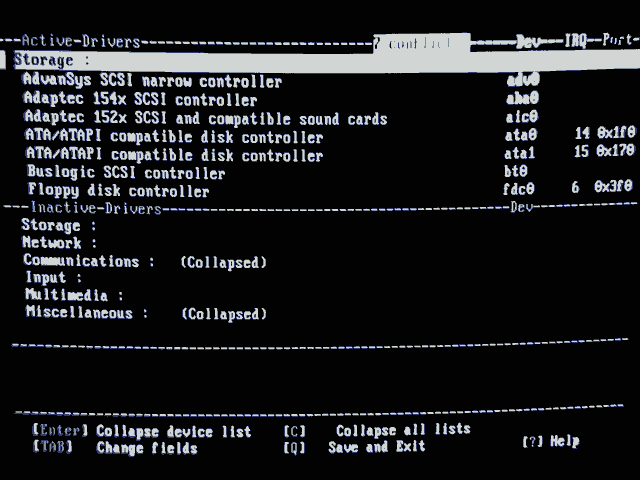
Start kernel configuration in full-screen visual mode, select "Storage", and hit "Enter." This is what you'll see:
Now you know why we identified our network and storage peripherals earlier: you're going to want to remove unnecessary stuff, while very carefully NOT removing anything you actually use. Most folks will be using the ATA/ATAPI compatible disk controllers (one for each of your motherboard's two on-board IDE controllers), and the Floppy disk controller. I personally also leave the Buslogic SCSI controller, which may or may not be necessary on IDE-only systems - one of these days I'll even get experimental and actually find out.
Once you're done deleting unused storage drivers, highlight Network and hit enter. You'll see a whole bunch of possible network cards in here - one of which may or may not be your network card type. If you don't see your card in there, DON'T PANIC! It's probably built into the kernel anyway, and just isn't one of your options to remove from this screen. The network card in the machine above is an SiS 900 chipset onboard, which is NOT listed in the Network section - so I deleted EVERYTHING out of the section. Which is fine - just make sure you DON'T get rid of the driver for your own NIC, if it's in there. If in doubt, at least leave the NE2000 compatible - it'll pick up just about anything else not explicitly covered with its own driver.
Continuing down to Communications, I personally get rid of everything - I personally haven't got the faintest use for TCP/IP over a parallel cable or a serial cable. Most likely, you don't either. You may get rid of these entries, or leave them in, at your own discretion. Once you're done with that, Input, Multimedia and Miscellaneous don't have anything in them really worth getting rid of at this point, so hit "Q" and let's move on!
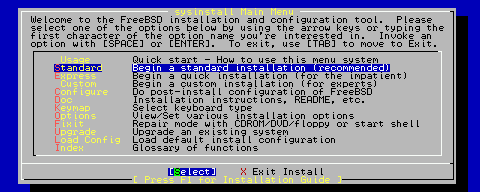
After you see a couple messages about starting up holographic shells and such-like, you'll be presented with the sysinstall main interface, which looks like this:
Sysinstall main interface
Surprisingly enough, given the title of these articles, I don't particularly recommend the Express install unless you really know what you're doing - it'll work, but it'll leave you with some GAPING problems requiring immediate fixing. So let's go with Standard, and get cracking!
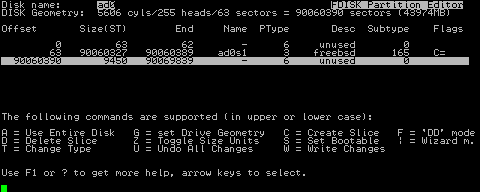
The first thing FreeBSD wants to do is partition (or re-partition) your hard drive. After hitting "enter" to the splash screen that tells you this and gives you a bit of detail about the process, you'll see something like this:
Since we're devoting the entire hard drive to FreeBSD (what's the point of a dual-booting SERVER, anyway?), we don't really have to worry about what's on there already - in this case, an old FreeBSD installation, in your case, probably an old Windows installation. All we really need to do here is hit "A" to tell FreeBSD that we want to make one single partition that uses all of the available drive space. Once you've done that, hit "Q" to save your changes and move on.
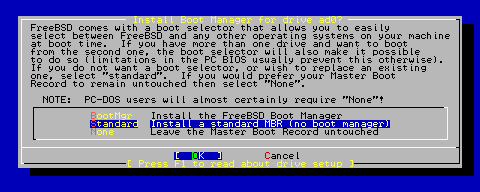
Keeping this short and sweet, since we're installing FreeBSD as a standalone OS on this system, we DON'T want to futz around with the default choice, BootMgr. Instead, we want Standard - don't bug me when I turn on the system, just boot! Highlight it, and hit "enter". Things are about to get a little more interesting...
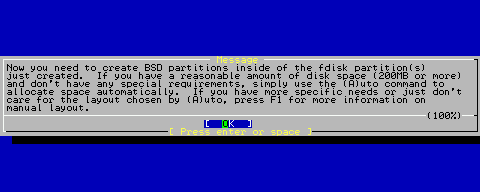
Now, while the splash screen for the slice manager tells you that you can safely hit "Auto" if you have a mere 200MB of space available, I'm going to tell you flat out that baby, it just ain't so. If you've got a tiny drive or a really miniscule amount of RAM, the defaults picked by Auto aren't going to work very well, and may in fact cripple your system badly enough to need reinstallation. Once again, while you can certainly install FreeBSD on less, it's a touchier procedure, and beyond the scope of this article. But hey, that's why we made sure we had at least 64MB and 2GB to work with, right? ... Right? OK, moving on:
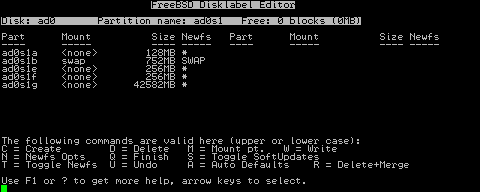
OK, this is where you make slices in your partition to store various essential bits of the OS and your data. Since this is a simple install and - must I stress it again? - you have at least 64MB and 2GB to work with, we're not going to dabble about in this. Just hit "A" for Auto Defaults, and it will slice up the partition like a sushi chef, leaving you with 128MB for / (the root directory), about double your RAM size for the swap, 256MB apiece for /tmp and /var, and the remainder of the partition allocated to /usr. Dandy! Hit "Q" to save your changes, and we'll keep this thing rolling right along.
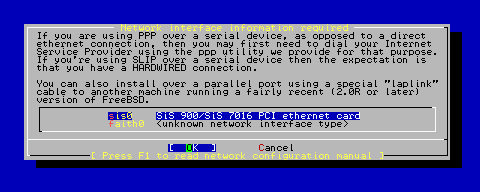
At this point, the system is going to want to configure network interfaces. Depending on how much you did or didn't delete out of the kernel config area, you'll see something similar to this:
Generally, the top entry is your network card, which is what we want to configure at this stage. (Modem users may have a different take on things - and we're not going to get into PPP configuration here. For now, we're assuming that you DO want to configure a NIC and DON'T want to configure a modem.) Common network interfaces are sis0, rl0, ed0, xl0, and pn0, among others - the important bit is, they're generally all going to say "ethernet card" on the tag end of the description. If you DON'T have an ethernet card listed here, you're in trouble - most likely, you deleted out the driver for your NIC during kernel configuration. If you continue to have problems at this point, you might want to consider NOT deleting ANY network interfaces out of your kernel config - generally speaking, having support for the extra interfaces built into your kernel won't typically hurt anything.
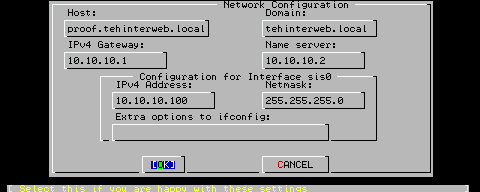
The next thing it's going to want to know is if you'd like to configure IPv6. I'll put it to you this way - unless you already know perfectly well that you want and need IPv6 right now, no, you don't want to. And in particular, if you don't know what IPv6 is, select no! The next thing it wants to know is if you'd like to try DHCP configuration of the interface. For the purposes of these articles, you do not want to attempt DHCP - if the machine is going to be a server, it's going to need a static IP address. So no DHCP for you! Next, it will bring up an IPv4 configuration screen for the interface:
If you didn't use DHCP - and you didn't, right? - you'll need to fill out all of the information on the screen except "Extra options to ifconfig". "Host" will be the name you want to christen this server with. "Domain" is a little trickier - if you DON'T have a pre-existing domain name server assigning DNS records to point at IP addresses on your local network (and if you don't know the answer to this, you almost certainly don't) then you'll need to make up a local domain. I strongly suggest doing so using .local for the top level domain - ie, my private network is named tehinterweb.local, as you can see above. The advantage to doing this is that you are absolutely guaranteed that you aren't using the same domain name as a real domain somewhere out there on the public internet, and you'll know at a glance whether you're looking at internal or external DNS stuff, potentially saving you a lot of confusion down the road. Once you've got the Domain field filled out, sysinstall will automatically append it to your hostname - so proof became proof.tehinterweb.local in our example above.
Later on in another article, we'll discuss setting up BIND so that other computers on your network will know where yourhost.yourdomainname.local is, and how to set up DNS records for those other computers and/or network devices too - but for right now, we're done with this screen, and it's time to select OK and move on.
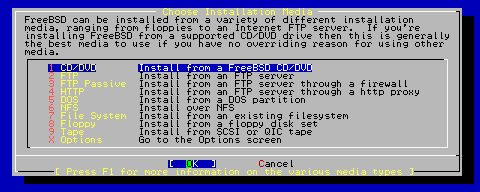
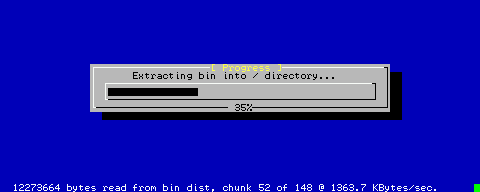
Hopefully, you don't need me to tell you to highlight CD/DVD and hit enter on this media selection screen. It's worth noting that VERY occasionally, you may run into a system in which FreeBSD has trouble identifying the CD-ROM drive at this point, even though it booted off of it - this generally has something to do with the type of emulation the motherboard and/or the CD-ROM itself uses for CD-ROM boots. If you have problems here, you can try swapping the CD-ROM drive to another IDE channel as a standalone master, trying a completely different CD-ROM drive, or - if you've got a broadband connection and an hour or three to kill - installing from FTP. But most likely, as soon as you hit OK, it'll immediately start moving data:
All we're actually installing right now is the base system, so this shouldn't take but a minute or two. Once it's done, you'll get a congratulatory little message about having installed FreeBSD on your system, and once you've hit enter, things will get interesting again! It will ask you a series of questions about how to configure your machine - if you want to function as a network gateway, if you want to configure inetd, if you want anonymous FTP access, if you want to be an NFS server, if you want to be an NFS client, and if you want to use a default security profile. For right now, the answer to all these questions is "no". Yes, even if you really do want to run NFS later. Trust me on this one - for right now, just get the OS installed; you can get fancy later once you've actually got it working. Once you're done with the "no, no, no, no, no, and no" you'll get a splash screen telling you a bit about the "moderate" security settings that you got by answering "no" to the default security profile and warning you that security breaches are like forest fires; only YOU can stop them. Great. Hit enter, and we're back to telling it no again: we don't want to change the console settings. However, we DO want to set the machine's time zone, so tell it so, tell it the CMOS clock isn't set to UTC, and pick a continent, a region, and a time zone. (Note: the page down and page up keys DO work on these menus, and since they're alphabetized, they'll come in quite handy for those of us from the United States, as well as the Venezuelans in the crowd.)
Once you've picked a zone and confirmed that it looks reasonable, you'll be asked if you want to enable Linux binary compatibility. For now, the answer is "no" - if you want Linux binaries at a later date, you can always come back and install this module then. These articles are going to focus heavily on using the ports tree to compile all your own applications as native FreeBSD binaries from source code, though, so it's unnecessary for now.
Next, you'll get asked if you've got a non-USB mouse attached to the system. Answer the nice computer, and move right on along - presuming the answer is "yes", you'll get a chance to test and enable the mouse daemon. Test it, see if the arrow makes nice wigglies when you move the mouse (it won't do anything when you click, so don't worry about that), and click "Enable" if it did or "Cancel" if it didn't. If the mouse didn't work, DON'T sweat it - you're using a command-driven operating system, here, and if you're following along with these articles, you're going to be learning how to live at the command line and like it. So if the mouse doesn't seem to want to work, file it under "stuff to worry about some other day" and move right on along.
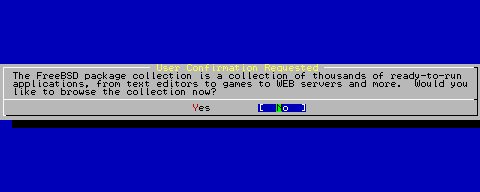
This popup gets its own screenshot because you do not, repeat, do NOT want to browse the package collection right now. Once again, we're here to install FreeBSD right now, not put a bunch of apps on it - that comes later. Be warned, if you decide to ignore me and go play through the packages collection right now anyway, you can easily screw up your installation. There are thousands of things in packages ranging from "nifty" to "inadvisable", none of which are described in enough detail in the packages menu to choose if you don't already know what they are before going in there. Finally, this is NOT the only time you'll ever be able to use that menu to install packages - you can return to it at any time once you've finished installing the OS. So please, please, don't make life difficult - select "No" and KEEP MOVING!
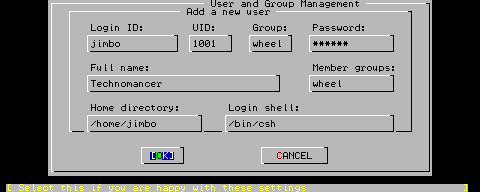
The next thing sysinstall wants to know is if you'd like to add another user account to the system. Yes, you would! Not only is logging in as root extremely insecure, if you do not have another user account on the system, you will not be able to remote control it. So tell it "yes", tell it you want to add another User to the system, and here we are:
There are a few things worth noting on this screen. UID is filled out for you (and shouldn't be changed unless you know what you're doing), Full name defaults to "User &" and is utterly unimportant (it's just a "comment" field) and Home directory defaults to /home/[whatever you put for Login ID], but the rest needs to be filled out and/or changed. In particular, make sure that you enter wheel in the Group field so that you will be able to assume root privileges using this account, and that you change your Login shell from /bin/sh to /bin/csh. (Linux expatriates, bash isn't available right now - you can install it from ports when we're done, but in the meantime, /bin/csh is what you want.) The default shell is extremely painful to work with, so don't forget to do this! Once you're done, highlight "OK" and hit enter, highlight "Exit" and hit enter in the next screen, and you'll be prompted to set the root password. Do so, tell it you don't need to visit the general configuration menu to set any last options, and you'll be back at the sysinstall main menu - and when you select "Exit Install", the system will reboot into FreeBSD!
