Samba, Installation
Installing Samba under FreeBSD is simple and painless. The easiest method is to install from ports, which also guarantees you'll get the latest released version. Be sure to use CVSUP to update your ports tree before installing any software.
See also: Samba - Samba_Configuration
All operations listed in this article must be performed by the superuser, so su to root.
This install procedure will walk you through a basic, simple Samba install. No printers, no complicated options, just samba with some extended logging options which you don't even have to ever look at to run or use samba.
First, find the port:
oyabun# cd /usr/ports/net
oyabun# ls | grep samba
gnosamba
py-samba
samba
samba-devel
samba-libsmbclient
samba3
sambasentinel
oyabun#
This lists all samba-related ports in the net category. We want the samba port.
oyabun# cd samba
Now, we need to install it.
oyabun# make install clean
This will start the installation process, downloading and compiling the necessary files. It will install it (after it asks some questions) and then it will clean all the work files after it's done.
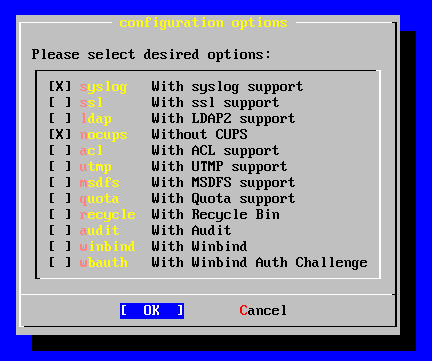
Shortly, you'll see a menu, which you should configure thusly:
With syslog will enable some logging to the syslog, as well as Samba's internal logs. Without CUPS means you don't want to configure print services right now, you just want Samba to share your files.
Make sure both of those options are selected (by moving the arrows keys and selecting them with space) then hit enter. Samba will now be installed, and barring accidents or problems, you will eventually be dumped back to a shell# prompt.
Make sure you have the following line in your /etc/rc.conf so that samba will startup on boot.
samba_enable="YES"
That's it. You just installed Samba. Now you need to configure it ( Samba_Configuration ), but you're done with step one.
