Intel (x86) - Quick Install Guide
Silicon.wolf (Talk | contribs) (→SYSINSTALL-ing FreeBSD) |
|||
| (21 intermediate revisions by 6 users not shown) | |||
| Line 1: | Line 1: | ||
| − | Lets have | + | Lets have no misconceptions here... Please. This guide, is only what it says it is. A Quick Install Guide. This guide, says very little, to nothing of how to secure your newly installed BSD system. Only the quickest, and easiest way to do so. Hopefully, someone rather knowledgeable in that subject will write that one for us. ;) |
=Introduction= | =Introduction= | ||
| − | This guide, will cover installing FreeBSD | + | This guide, will cover installing FreeBSD 8.2-Release from CD/FTP for the Intel x86, x86-64, and AMD64 platforms. Since the variation between 32bit and 64bit is nominal, additional information or instructions will be indicated when applicable. |
| + | |||
| + | Note: Release 9.0 and newer releases no longer use the sysinstall process so what follows is only applicable for Release 8.x and older releases. | ||
This guide, will also assume that the general person reading it, is migrating from a Windows environment. (ie. Windows ME, 2000, XP, Vista) | This guide, will also assume that the general person reading it, is migrating from a Windows environment. (ie. Windows ME, 2000, XP, Vista) | ||
| Line 30: | Line 32: | ||
For the purposes of this tutorial, I will be installing FreeBSD on two different systems. An Intel Server System (x86 32bit), and an AMD64x2 (x86-84, AMD64, 64bit). | For the purposes of this tutorial, I will be installing FreeBSD on two different systems. An Intel Server System (x86 32bit), and an AMD64x2 (x86-84, AMD64, 64bit). | ||
| − | Both using the FreeBSD | + | Both using the FreeBSD 8.2-RELEASE, found at [http://www.freebsd.org/where.html The FreeBSD Website] |
==Pre-Install Checklist== | ==Pre-Install Checklist== | ||
| Line 44: | Line 46: | ||
I guess all you really need now, is a brief thing about the way BSD names devices. | I guess all you really need now, is a brief thing about the way BSD names devices. | ||
| − | + | sc0 is your system console | |
| − | + | kbd0 is you keyboard | |
| − | + | ppc0 is the parallelprinter port | |
| − | + | psm0 is the PS/2 mouse port | |
| − | + | fd0 is your first 3.5" floppy drive if you have one | |
| − | + | cd0 is your first cdrom drive, cd1 is your 2nd cdrom drive | |
| + | |||
| + | ada0 is your first ide device (ata, sata, pata) Hard drive disk | ||
| + | |||
| + | da0 is your first externaly cabled USB device | ||
| + | |||
| + | fw0 is a firewire device | ||
ar0 is a hardware raid device. | ar0 is a hardware raid device. | ||
| − | + | lo0 is your internal local loopback device (127.0.0.1) | |
| − | + | rl0 Realtec ethernet device | |
| − | + | xl0 3Com ethernet device | |
| − | + | fxp0 Intel ethernet device | |
| − | + | These 3 ethernet devices are the most common ethernet cards found on motherboards or plug in adapter cards. | |
| − | + | Note 1: BSD will bump the 0 in device names by 1 for each additional device of that same type. | |
| − | + | Note 2: These internal device names are listed to the system console during the boot hardware inspection process and have additional information about the device. Use the dmesg console command to display the boot log to read the boot messages. | |
| − | + | =Installing your System= | |
| − | - | + | Place the freshly made install media into the cdrom drive, and then restart your system. If you have to do something special at boot-time not to change your BIOS to boot from CD (ie. MSI has an <F11> option to choose from a bootlist of devices. |
| − | + | after BIOS has released your system and initiated the boot process, you should see | |
| − | + | [[Image:BSD-01.jpg]] | |
| − | + | if you don't see this, then go back, and try again. Something isn't set right. | |
| − | + | Ok, go ahead and hit enter at the text style Free BSD loader menu that's counting down at you. | |
| − | + | ||
| − | + | [[Image:BSD-02.jpg]] | |
| − | + | After a while of what a friend of mine one said "Looks like RoboCop loading up". You should see this screen.<br> | |
| − | + | Now you get to select what Country you are from! Hey, we're on our way! | |
| − | + | ||
| − | + | ||
| − | + | ||
| − | + | ||
| − | + | ||
| − | + | ||
| − | + | ||
| − | + | ||
| − | + | ||
| − | + | ||
| − | + | ||
| − | + | ||
| − | + | ||
| − | + | ||
| + | [[Image:BSD-03.jpg]] | ||
| − | After | + | After you have correctly chosen your Country, you are taken to the [http://www.FreeBSD.org/cgi/man.cgi?query=sysinstall&apropos=0&sektion=0&manpath=FreeBSD+6.2-RELEASE&format=html SYSINSTALL(8)] main menu. |
| − | + | Now the fun really begins. | |
| − | + | Depending on your system configuration, and such, you may see: | |
| + | Probing devices, please wait (this can take a while)... | ||
Now, we have reached the main menu of the FreeBSD [http://www.FreeBSD.org/cgi/man.cgi?query=sysinstall&apropos=0&sektion=0&manpath=FreeBSD+6.2-RELEASE&format=html SYSINSTALL(8)] utility. This utility will be your best friend, and worst enemy. | Now, we have reached the main menu of the FreeBSD [http://www.FreeBSD.org/cgi/man.cgi?query=sysinstall&apropos=0&sektion=0&manpath=FreeBSD+6.2-RELEASE&format=html SYSINSTALL(8)] utility. This utility will be your best friend, and worst enemy. | ||
| + | |||
| + | [[Image:BSD-04.jpg]] | ||
| + | |||
The more I use it the more I understand (kind of) what it's doing, and the reasons why... I'll try to *sidenote* some of this. | The more I use it the more I understand (kind of) what it's doing, and the reasons why... I'll try to *sidenote* some of this. | ||
| Line 120: | Line 118: | ||
1. Select the (S)tandard install option. | 1. Select the (S)tandard install option. | ||
This option will take you through the standard setup questions related to setting up your new FreeBSD System. You're now entering a world, much like you've seen before, and will make much more sense later. | This option will take you through the standard setup questions related to setting up your new FreeBSD System. You're now entering a world, much like you've seen before, and will make much more sense later. | ||
| + | |||
| + | [[Image:BSD-05.jpg]] | ||
| + | |||
| + | As a result, you will get this screen promptly after | ||
| + | |||
| + | [[Image:BSD-06.jpg]] | ||
| + | |||
| + | After pressing <space> or <enter> to get past the information, you'll see an ominous looking screen that looks like this one:<br> | ||
| + | For the purposes of screen shots, I used an emulated machine, and as such, my hard disc drives are named da instead of hd<br> | ||
| + | (hd will be used for purposes of uniformity and clearity). | ||
| + | |||
| + | [[Image:BSD-07.jpg]] | ||
| + | |||
| + | |||
| + | ==Unused Images== | ||
| + | |||
| + | [[Image:BSD-08.jpg]] | ||
| + | [[Image:BSD-09.jpg]] | ||
| + | [[Image:BSD-10.jpg]] | ||
| + | [[Image:BSD-11.jpg]] | ||
| + | [[Image:BSD-12.jpg]] | ||
| + | [[Image:BSD-13.jpg]] | ||
| + | [[Image:BSD-14.jpg]] | ||
| + | [[Image:BSD-15.jpg]] | ||
= end of line = | = end of line = | ||
| − | + | [[Category : Installation]] | |
Latest revision as of 10:29, 13 August 2012
Lets have no misconceptions here... Please. This guide, is only what it says it is. A Quick Install Guide. This guide, says very little, to nothing of how to secure your newly installed BSD system. Only the quickest, and easiest way to do so. Hopefully, someone rather knowledgeable in that subject will write that one for us. ;)
Contents |
[edit] Introduction
This guide, will cover installing FreeBSD 8.2-Release from CD/FTP for the Intel x86, x86-64, and AMD64 platforms. Since the variation between 32bit and 64bit is nominal, additional information or instructions will be indicated when applicable.
Note: Release 9.0 and newer releases no longer use the sysinstall process so what follows is only applicable for Release 8.x and older releases.
This guide, will also assume that the general person reading it, is migrating from a Windows environment. (ie. Windows ME, 2000, XP, Vista)
In the interim of this guide being completed, please refer to the installation chapters in The FreeBSD Handbook.
A Note to Windows Users:
It's time to put away your thoughts, and misconceptions about the ways that computers do things. Unix is going to take you on a journey, of relearning what you know. If you have previous experience with DOS, or you happen to be using the CMD command a lot, then you're in luck. For those of you whom arn't, we have quick ways of getting you to a GUI. You will see your shortcut, when the time comes, I promise.
You need to leave behind the idea of drive letters. Drives are no longer letters, and individual beasts as windows used to treat them. Drives in BSD are file systems. Simply a collection of your files, ready for your access when you want them. I mean, really, how many of us have named our "data" drives as something other than "New Volume" or "Local Disk". Well, it's so much easier to access files now then doing all of the drive changing, and such. You're drives, and file systems, are seamlessly aligned into place for you, with easy names to remember (usually ones you create).
Something else, you're going to see a LOT of things that may LOOK familiar if you are an experienced DOS/CMD user. Forget 98% of what you know. Everything you knew is getting ready to get turned on it side, and will only confuse you... Since I know that's not possible, I'll try to leave <DOS> type notes, things I figured out along the way...
Thank you for your patience while I complete this.
And have a scien-tastic day.
[edit] System Requirements
The basic system requirements, for installation of the AMD64 build of FreeBSD requires the following base hardware:
a 486 or better processor
at least 24 MB of RAM
150MB free HD space.
DVD/CD-ROM Drive
VGA Compatible video card
patience
For the purposes of this tutorial, I will be installing FreeBSD on two different systems. An Intel Server System (x86 32bit), and an AMD64x2 (x86-84, AMD64, 64bit). Both using the FreeBSD 8.2-RELEASE, found at The FreeBSD Website
[edit] Pre-Install Checklist
As you should be doing on a regular basis anyway (stops to laugh for a while). You need to make sure you have a good current backup of your data files. As with any operating system installation, you may accidentally delete something that you wanted to save. trust me. please.
The next step, is to check your personal hardware setup, verses that of the Intel - Hardware Compatibility List. Hopefully, you did this in the last step, but if you didn't, please take the time to do it now. It will save you some stress later. I promise.
Once you have determined whether or not your specific hardware is supported, you need to find windows drivers for your hardware that is not supported directly by BSD. Instructions will be given later on how to make all of your goodies work.
Ok, next comes your boot / install media. FTP, CD, DVD, or NetBoot are all nice options, but we're only talking about FTP, and CD/DVD. (BTW - if FreeBSD does not support one of your networking cards natively, then you won't be able to do an FTP install) I suggest, that if you're going to download a medium from the FreeBSD Server, that you go ahead, and download the full disc one. Unless you're low on space, or have a thing for burning your installer to a business card cd. But generally, the first CD has the fixit recovery shell available, should you need to fix your fstab file or something like that <cough>.
I guess all you really need now, is a brief thing about the way BSD names devices.
sc0 is your system console
kbd0 is you keyboard
ppc0 is the parallelprinter port
psm0 is the PS/2 mouse port
fd0 is your first 3.5" floppy drive if you have one
cd0 is your first cdrom drive, cd1 is your 2nd cdrom drive
ada0 is your first ide device (ata, sata, pata) Hard drive disk
da0 is your first externaly cabled USB device
fw0 is a firewire device
ar0 is a hardware raid device.
lo0 is your internal local loopback device (127.0.0.1)
rl0 Realtec ethernet device
xl0 3Com ethernet device
fxp0 Intel ethernet device
These 3 ethernet devices are the most common ethernet cards found on motherboards or plug in adapter cards.
Note 1: BSD will bump the 0 in device names by 1 for each additional device of that same type.
Note 2: These internal device names are listed to the system console during the boot hardware inspection process and have additional information about the device. Use the dmesg console command to display the boot log to read the boot messages.
[edit] Installing your System
Place the freshly made install media into the cdrom drive, and then restart your system. If you have to do something special at boot-time not to change your BIOS to boot from CD (ie. MSI has an <F11> option to choose from a bootlist of devices.
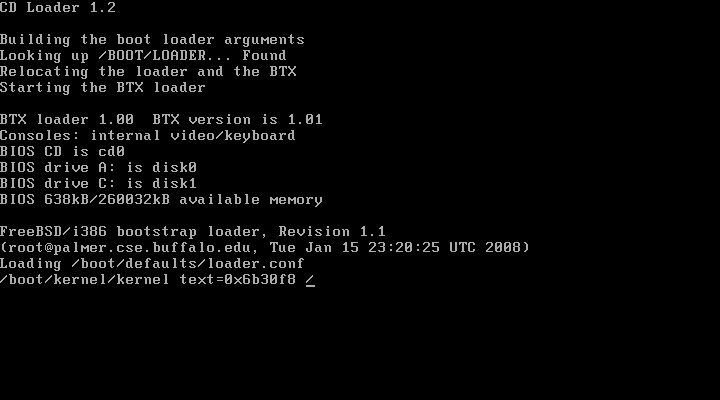
after BIOS has released your system and initiated the boot process, you should see
if you don't see this, then go back, and try again. Something isn't set right.
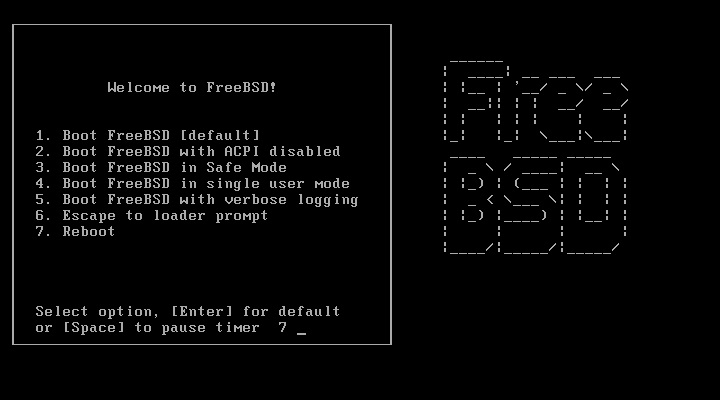
Ok, go ahead and hit enter at the text style Free BSD loader menu that's counting down at you.
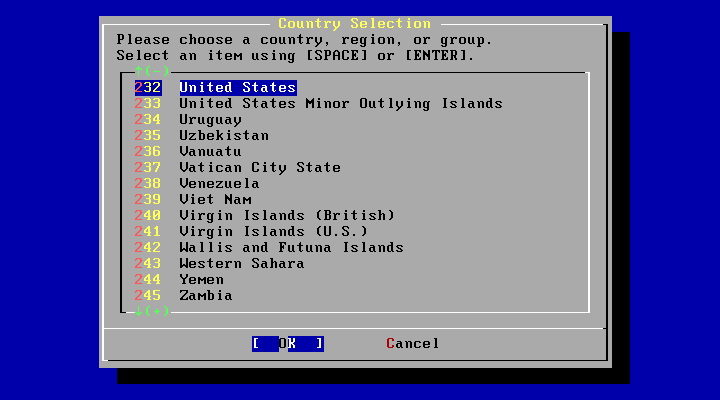
After a while of what a friend of mine one said "Looks like RoboCop loading up". You should see this screen.
Now you get to select what Country you are from! Hey, we're on our way!
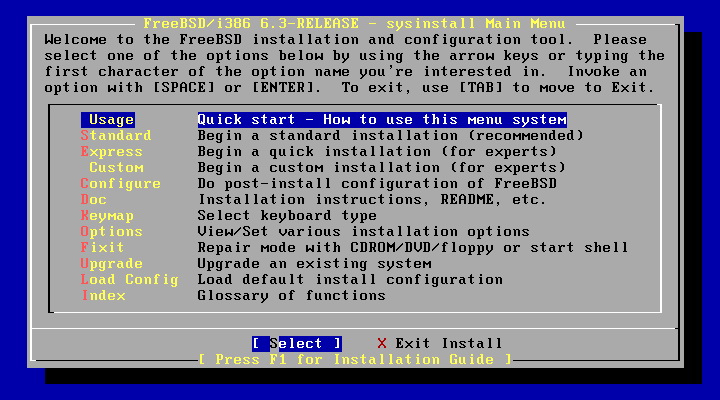
After you have correctly chosen your Country, you are taken to the SYSINSTALL(8) main menu.
Now the fun really begins.
Depending on your system configuration, and such, you may see:
Probing devices, please wait (this can take a while)...
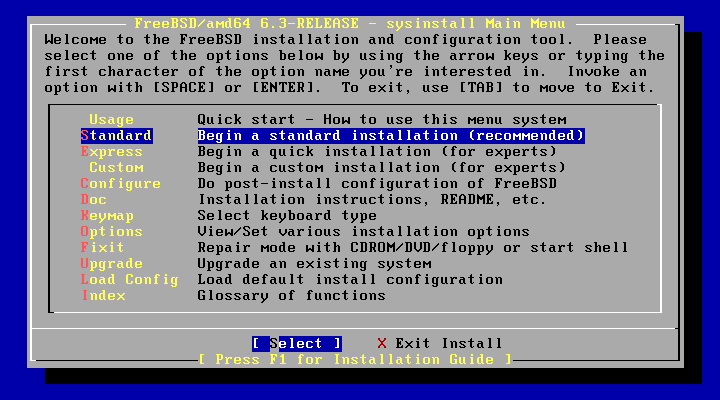
Now, we have reached the main menu of the FreeBSD SYSINSTALL(8) utility. This utility will be your best friend, and worst enemy.
The more I use it the more I understand (kind of) what it's doing, and the reasons why... I'll try to *sidenote* some of this.
[edit] SYSINSTALL-ing FreeBSD
You are presented with many options, and this menu seems very intimidating when you first see it. It's ok. It's nothing too harmful <evil laugh>.
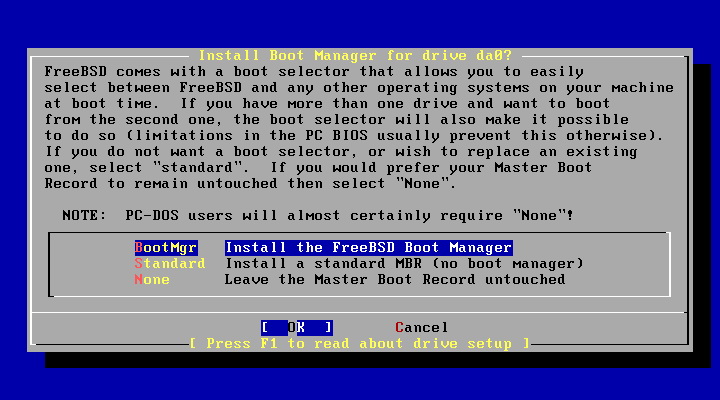
1. Select the (S)tandard install option. This option will take you through the standard setup questions related to setting up your new FreeBSD System. You're now entering a world, much like you've seen before, and will make much more sense later.
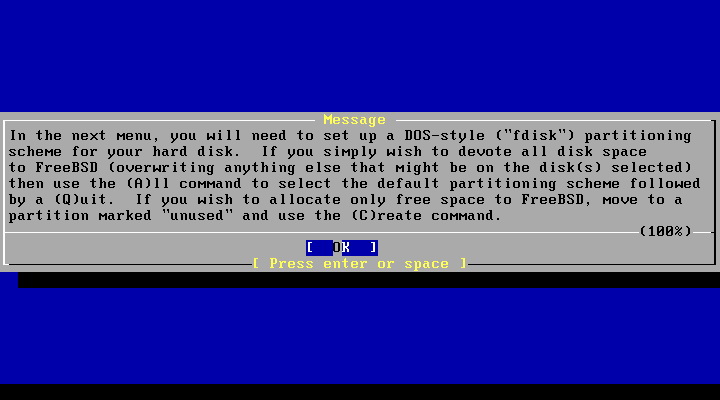
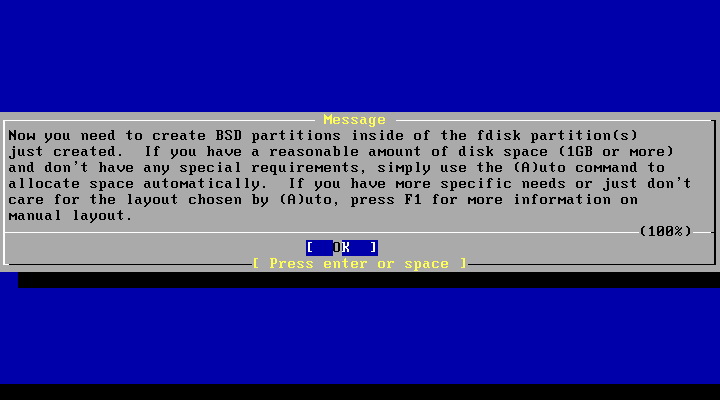
As a result, you will get this screen promptly after
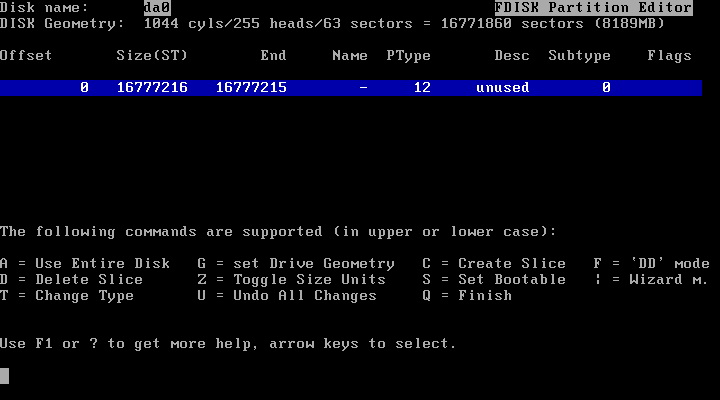
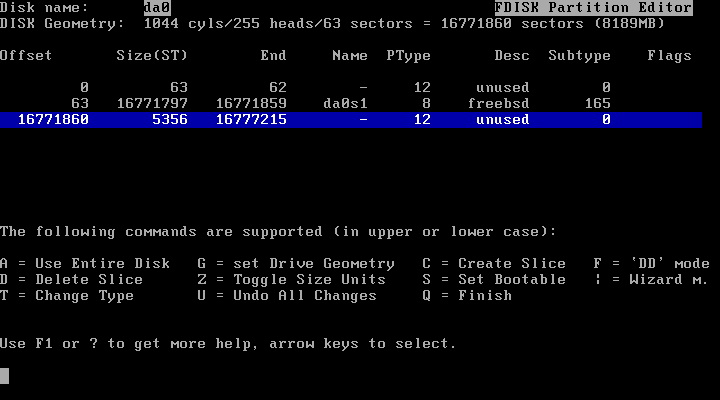
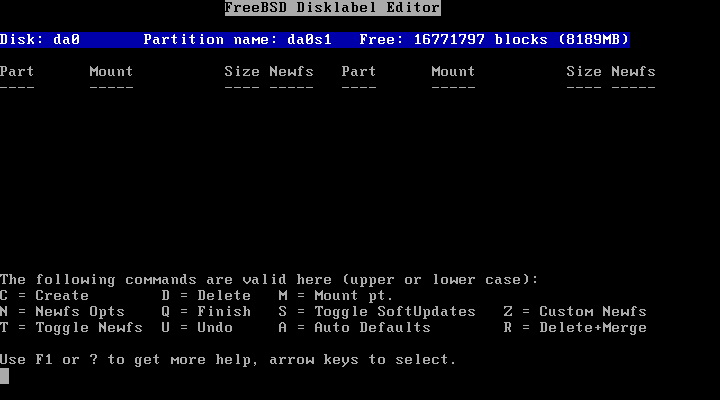
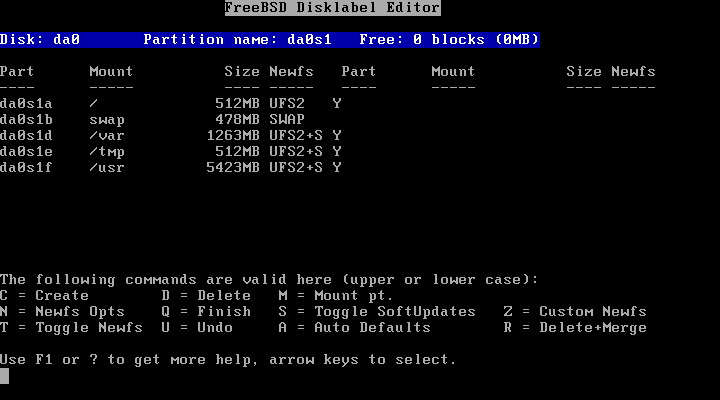
After pressing <space> or <enter> to get past the information, you'll see an ominous looking screen that looks like this one:
For the purposes of screen shots, I used an emulated machine, and as such, my hard disc drives are named da instead of hd
(hd will be used for purposes of uniformity and clearity).
